Install
#remotes::install_github("lgnbhl/muiTreeView") # dev version
install.packages("muiTreeView")MUI Rich Tree View
Use RichTreeView() with the asMuiTree()
helper function:
df <- data.frame(
  pkg = c("muiTreeView", "muiTreeView", "muiTreeView"),
  functions = c("SimpleTreeView", "RichTreeView", "RichTreeView"),
  args = c("items", "items", "onItemSelectionToggle")
)

treeItems <- asMuiTree(df)

RichTreeView(
  items = treeItems
)
Multi selection and checkbox
You can activate checkbox selection with
checkboxSelection = TRUE and multi selection with
multiSelect = TRUE:
RichTreeView(
  items = treeItems,
  checkboxSelection = TRUE,
  multiSelect = TRUE # FALSE for single select,
)
Add data with asMuiTree()
The helper function asMuiTree() transforms your
dataframe in a structure which can be used with
RichTreeView().
You can provide a vector of the column names to select and choose the level order of the tree nodes, for example:
df <- data.frame(
  pkg = c("muiTreeView", "muiTreeView", "muiTreeView"),
  functions = c("SimpleTreeView", "RichTreeView", "RichTreeView"),
  args = c("items", "items", "onItemSelectionToggle")
)

treeItems <- asMuiTree(df, c("functions", "pkg"))

str(treeItems, max.level = 3)
#> List of 2
#>  $ :List of 3
#>   ..$ label   : chr "SimpleTreeView"
#>   ..$ id      : chr "SimpleTreeView-7030611"
#>   ..$ children:List of 1
#>   .. ..$ :List of 2
#>  $ :List of 3
#>   ..$ label   : chr "RichTreeView"
#>   ..$ id      : chr "RichTreeView-3110731"
#>   ..$ children:List of 1
#>   .. ..$ :List of 2
asMuiTree() creates also unique IDs for each node by
joining the name of the label with an random integer between a dash.
df <- data.frame(
  pkg = c("muiTreeView", "muiTreeView", "muiTreeView"),
  functions = c("SimpleTreeView", "RichTreeView", "RichTreeView"),
  args = c("items", "items", "onItemSelectionToggle")
)

treeItems <- asMuiTree(df, c("functions", "pkg"))
# treeItems <- list(
#   list(
#     label = "muiTreeView", id = "muiTreeView-1",
#     children = list(
#       list(
#         label = "SimpleTreeView", id = "SimpleTreeView-2",
#         children = list(
#           list(label = "items", id = "items-3")
#         )
#       ),
#       list(
#         label = "RichTreeView", id = "RichTreeView-4",
#         children = list(
#           list(label = "items", id = "items-5"),
#           list(label = "onItemClick", id = "onItemClick-6")
#         )
#       )
#     )
#   )
# )

RichTreeView(
  items = treeItems
)
As asMuiTree() is adapted from shinyWidgets::create_tree(),
I want to thank the authors of shinyWidgets for their amazing work!
Rich Tree View default selection and expand
Select by default one or multiple items with the
defaultSelectedItems argument by providing its related
IDs.
You can also expand by default one or multiple nodes with the
defaultExpandedItems argument by providing its related
IDs.
df <- data.frame(
  pkg = c("muiTreeView", "muiTreeView", "muiTreeView"),
  functions = c("SimpleTreeView", "RichTreeView", "RichTreeView"),
  args = c("items", "items", "onItemSelectionToggle")
)

treeItems <- asMuiTree(df)

defaultSelectedId <- treeItems[[1]]$children[[1]]$children[[1]]$id
defaultExpandedId_1 <- treeItems[[1]]$children[[1]]$id
defaultExpandedId_2 <- treeItems[[1]]$id

RichTreeView(
  items = treeItems,
  defaultSelectedItems = list(defaultSelectedId), # always in list()
  defaultExpandedItems = list(defaultExpandedId_1, defaultExpandedId_2) # always in list()
)
Custom styling
As muiTreeView is using the Material UI library under the hood, you can customize component styles using CSS classes with the “sx” argument:
RichTreeView(
  items = treeItems,
  sx = list(
    ".MuiTreeItem-root" = list(
      ".Mui-selected, .Mui-selected:hover, .Mui-focused.Mui-selected" = list(
        background = "red",
        color = "white"
      )
    )
  )
)
Note that even if the CSS classes are deprecated they are still working.
You can access all Material UI components using the shinyMaterialUI R package.
Simple Tree View
Using SimpleTreeView() with TreeItem(), you
can easily customize items with icons for example:
library(htmltools)

SimpleTreeView(
  defaultExpandedItems = list("documents"), # always in list()
  defaultSelectedItems = list("notes"), # always in list()
  TreeItem(
    itemId = "documents",
    label = div(shiny::icon("folder"), " Documents"),
    TreeItem(
      itemId = "notes",
      label = div(shiny::icon("file"), " Notes")
    ),
    TreeItem(
      itemId = "images",
      label = div(shiny::icon("image"), " Images"),
      sx = list(
        ".Mui-selected, .Mui-selected:hover, .Mui-focused.Mui-selected" = list(
          background = "lightgreen",
          color = "white"
        )
      )
    ),
    TreeItem(
      itemId = "videos",
      label = div(shiny::icon("video"), " Videos"),
      sx = list(
        ".Mui-selected, .Mui-selected:hover, .Mui-focused.Mui-selected" = list(
          background = "lightblue",
          color = "white"
        )
      )
    )
  ),
  TreeItem(
    itemId = "history",
    label = div(shiny::icon("history"), " History")
  ),
  TreeItem(
    itemId = "trash",
    label = div(shiny::icon("trash"), " Trash")
  )
)
Usage with Shiny
You can get user item clicked in Shiny using the
onItemSelectionToggle argument (more info here),
by creating a “itemSelection” input with
shiny.react::setInput().
As the “itemSelection” input returns the label name followed by a
dash “-” with a random integer, you can get the cleaned label using
gsub(),
i.e. gsub(pattern = "\\-[[:digit:]]*$", replacement = "", x = input$itemSelection)
Track latest item clicked
library(shiny)

df <- data.frame(
  pkg = c("muiTreeView", "muiTreeView", "muiTreeView"),
  functions = c("SimpleTreeView", "RichTreeView", "RichTreeView"),
  args = c("items", "items", "onItemSelectionToggle")
)

treeItems <- asMuiTree(df)
defaultExpanded <- treeItems[[1]]$id
defaultSelectedId <- treeItems[[1]]$children[[1]]$id

# remove dash "-" followed by a random digit (i.e. MUI tree ID)
# to return only item label
cleanTreeId <- function(treeId) {
  gsub("\\-[[:digit:]]*$", "", treeId)
}

ui <- tagList(
  RichTreeView(
    items = treeItems,
    # expand by default a node with its id
    defaultSelectedItems = list(defaultSelectedId), # always in list()
    defaultExpandedItems = list(defaultExpanded), # always in list()
    onItemSelectionToggle = setInput(
      inputId = "itemSelection",
      jsAccessor = "[1]"
    )
  ),
  verbatimTextOutput("treeLabel")
)

server <- function(input, output, session) {
  output$treeLabel <- shiny::renderPrint(
    if(is.null(input$itemSelection)) {
      cleanTreeId(defaultSelectedId)
    } else {
      cleanTreeId(input$itemSelection)
    }
  )
}

shinyApp(ui, server)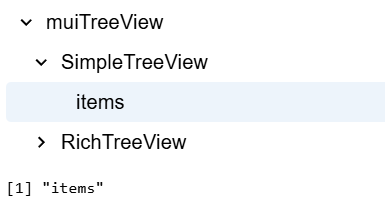
Track multiple items with checkbox selection
You can use the same Shiny logic with multiple selection.
Use the selectionPropagation argument to choose if
selecting a parent item does select its children (it doesn’t by
default).
library(shiny)

df <- data.frame(
  pkg = c("muiTreeView", "muiTreeView", "muiTreeView"),
  functions = c("SimpleTreeView", "RichTreeView", "RichTreeView"),
  args = c("items", "items", "onItemSelectionToggle")
)

treeItems <- asMuiTree(df)

defaultExpandedId <- treeItems[[1]]$id
defaultSelectedId <- treeItems[[1]]$children[[1]]$children[[1]]$id

# remove dash "-" followed by a random digit (i.e. MUI tree ID)
# to return only item label
cleanTreeId <- function(treeId) {
  gsub("\\-[[:digit:]]*$", "", treeId)
}

ui <- tagList(
  RichTreeView(
    checkboxSelection = TRUE,
    multiSelect = TRUE,
    items = treeItems,
    # expand by default a node with its id
    defaultExpandedItems = list(defaultExpandedId), # always in list()
    defaultSelectedItems = list(defaultSelectedId), # always in list()
    # By default, selecting a item does not select its children.
    selectionPropagation = list(
      descendants = TRUE, # FALSE by default
      parents = FALSE # FALSE by default
    ),
    onItemSelectionToggle = setInput(
      inputId = "itemSelection",
      jsAccessor = "[1]"
    )
  ),
  #verbatimTextOutput("treeId"),
  verbatimTextOutput("treeLabel")
)

server <- function(input, output, session) {
  # Reproduce logic from official MUI's documentation
  selectedItems <- reactiveValues(
    selected = defaultSelectedId
  )

  observeEvent(input$itemSelection, {
    current_selection <- input$itemSelection

    if(current_selection %in% selectedItems$selected) {
      # Remove if already selected
      new_selection <- setdiff(selectedItems$selected, current_selection)
    } else {
      # Add if not selected
      new_selection <- c(selectedItems$selected, current_selection)
    }

    selectedItems$selected <- new_selection
  })
  # output$treeId <- shiny::renderPrint(
  #   # return item label with tree ID (not cleaning with gsub())
  #   selectedItems$selected
  # )
  output$treeLabel <- shiny::renderPrint(
    cleanTreeId(selectedItems$selected)
  )

}

shinyApp(ui, server)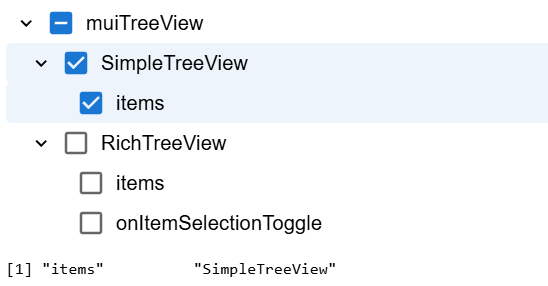
More features
Explore the official MUI Tree View documentation to see how more features can be added.
Use other MUI products
MUI X Tree View is developed MUI, the company behind the popular React framework Material UI. muiTreeView is therefore a companion to the R package muiMaterial , which provides access to all Material UI components from R.
Bootstrap conflict
muiTreeView can enter in conflict with the Bootstrap
CSS framework, used by default in Shiny functions such as
shiny::fluidPage() and friends.
You can use muiMaterial::muiMaterialPage() and
muiMaterial::CssBaseline() to avoid using Bootstrap and
normalized CSS. See muiMaterial
docs for more information.
Contribute
If you have any issue, question or want to contribute with a pull request, don’t hesitate to write me on https://github.com/lgnbhl/muiTreeView
For updates follow Felix Luginbuhl on LinkedIn.